Business Documents is a standard tool in Microsoft Dynamics 365 Finance & Operations (D365FO) that enables the visualization of documents and reports. It leverages the Electronic Reporting (ER) framework as the primary engine for data extraction and formatting. In my previous videos here, I demonstrated how to customized a business document with custom labels.
In this post, I’ll guide you through the process of customizing a standard business document with custom labels. This tutorial builds on Part 7 to give you deeper insights into updating custom labels.
Setting Language Setting in the Format Designer
In the format designer, under “Format” level, you can set Date, time, and number format preferences by navigating to Language settings > Language preferences. Here are the available options:

- <Empty>: The system uses the preferred culture.
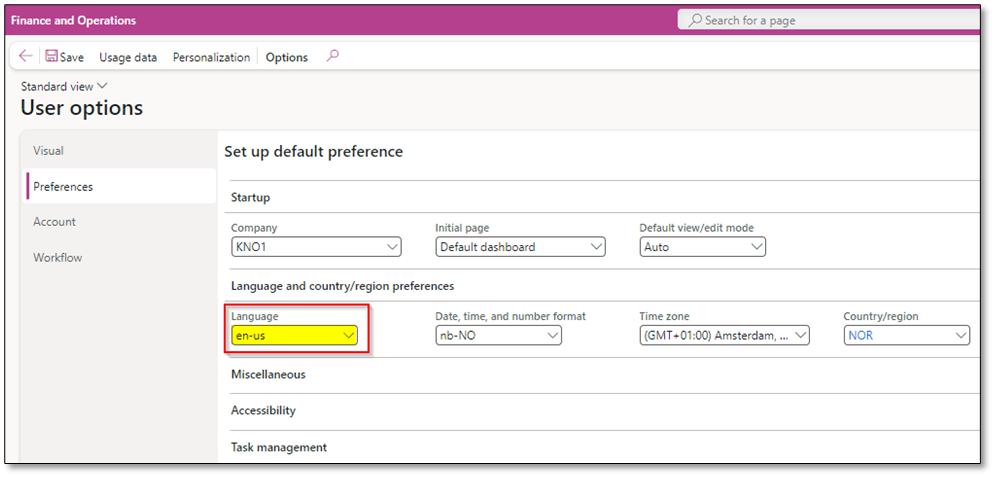
- User preference: The format follows the user’s culture setting from user options.
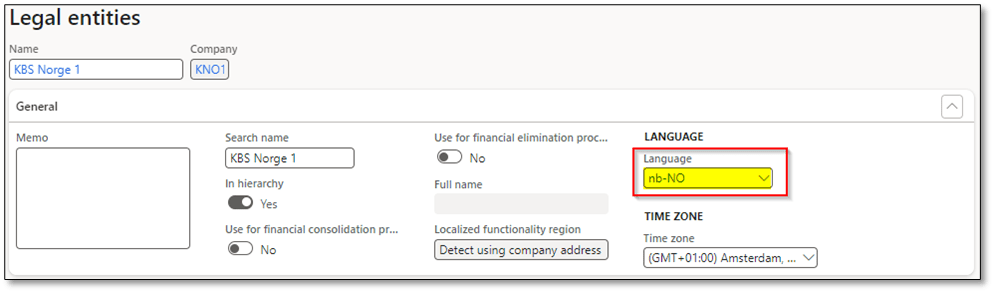
- Company preference: The format is based on a specific language ID on the legal entity card.

- Explicitly defined: The format is defined for a specific language ID.

- Defined at run-time: The format is based on the culture specified at runtime. It means that you used a binding from model mapping that represents language id. Once you choose this alternative, you can navigate to “Mapping” field and add a value on “Language”. This value needs to be added from the model mapping.

Below is an example of language preferences for Free Text Invoices, demonstrating how a document or invoice can be generated in the preferred language through the view/print action. To apply language preferences, you need to use label codes in your model, either from system labels or GER (Electronic Reporting) labels.


Using System Label Codes
To apply a system label code, follow this structure:
@”SYS Code” > @”SYS37017″
This will return the value of the specified system label code.
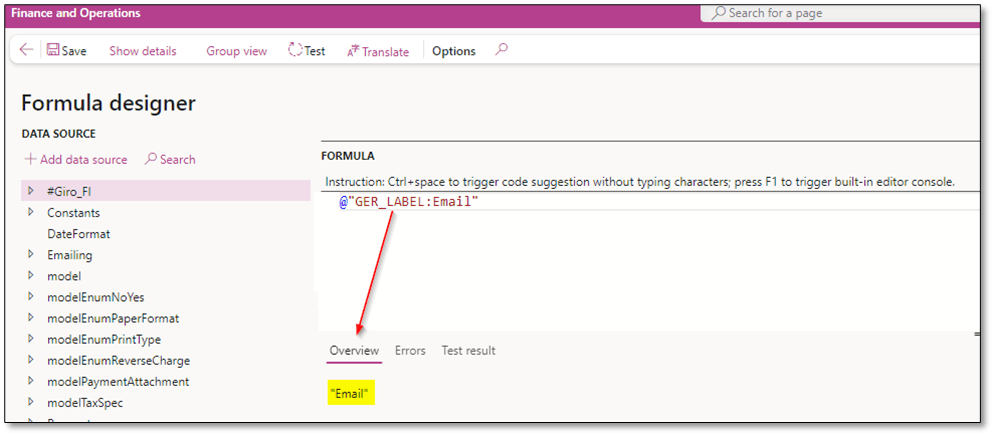
Using GER (Electronic Reporting) Label Codes
GER Labels can be created either on data model or format designer. To apply a GER label code, use the following structure:
@”GER Label: Label code” > @”GER_LABEL:Email”
This will return the label code value defined in the ER configuration.
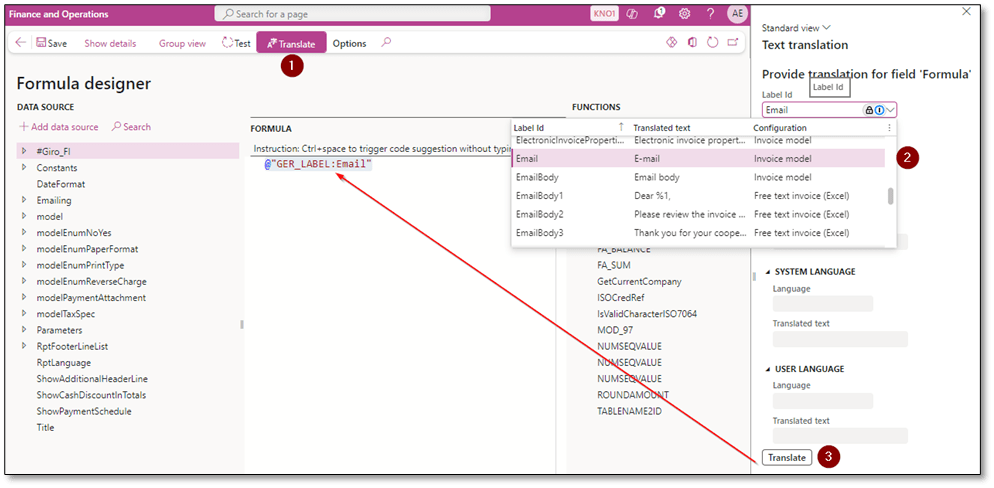
Finding the Correct ER Label Value
To locate the exact label value:
- Identify the required element (e.g., the email node).
- Click Edit Formula.
- Select Translate, then search for the actual Label ID.
- Click Translate again to populate the ER label ID into the formula.
This approach allows you to seamlessly incorporate localized labels into your documents, ensuring they align with the selected language preferences.

To check the translation of a specific label ID in a particular language using the ER designer, you can apply the following formula. This method helps you identify the translation and evaluate whether a custom translation is required.
GETLABELTEXT(labelID-Without@, languageID)

Add Custom ER Label Value
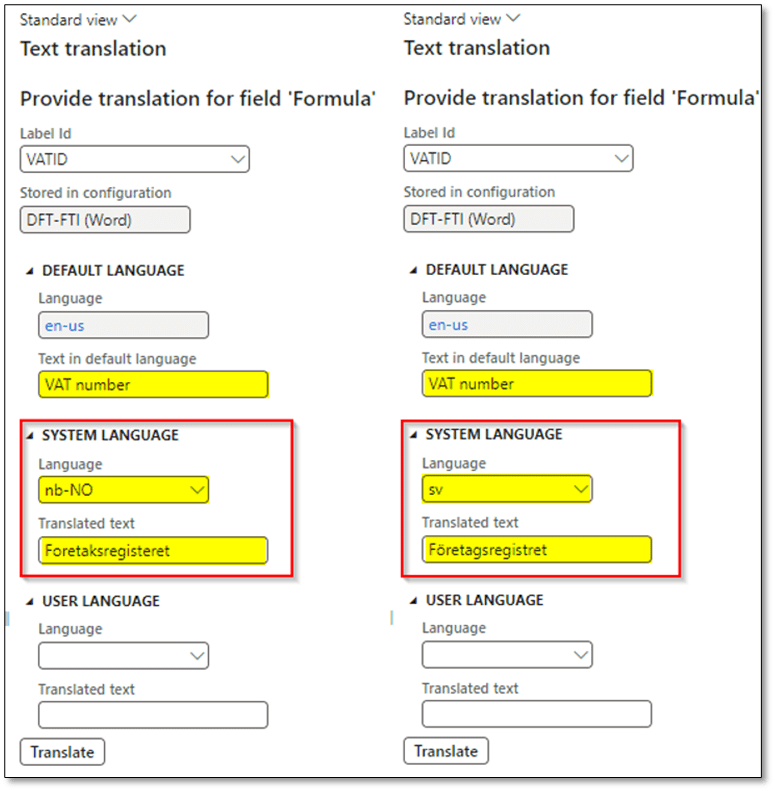
To add custom ER label value, you can either define the value on custom data model or format designer. In this scenario, I have created a derived version of “Free text invoice (Word)” and I can define custom ER label via Format designer. In this case, click on one element that you want to add custom ER label and click on “Edit formula”. Then click on “Translate” and define a label id that is unique. Then define a value for this label as a text in default language that is en-us:English and then you can choose required language code and add translated text.
Once you add text, click on save and the provided values will be populated based on provided language id.
In following example, I have added translation for Norwegian language and Swedish:
Export ER Label Values
You can export GER/ER labels from a Data Model:

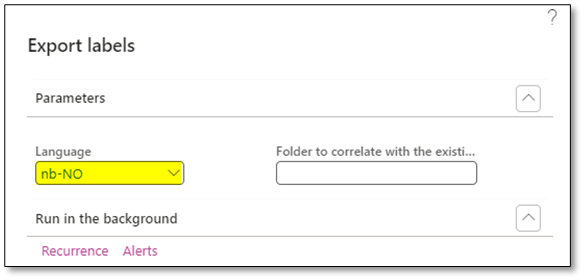


Or a Format Designer:


If you define labels within the invoice model in ER, they will be accessible in both the data model and format designers, providing broader usage across configurations. However, if you define labels specifically in a format designer, they will only be accessible within that format and its derived versions, limiting their applicability to a narrower scope. This distinction is critical when planning label usage to ensure they are available where needed in the ER framework.

To import custom labels into ER, you can use the “Load label” function. This requires preparing the labels in the appropriate file format. Once the file is ready, you can import the custom labels into the ER data model or format designer, depending on where you want to use them. This functionality helps ensure the labels are correctly integrated and available for customization in the selected ER configurations.

I hope this post provides valuable insights into understanding Configurable Business Documents (CBD). If you have any questions or feedback, please leave a comment below. Your input is highly appreciated!
